Table of Contents
ToggleTracking form submissions is crucial for understanding user behavior, optimizing conversion rates, and enhancing your marketing strategy. Whether you’re running a lead generation campaign or collecting feedback, knowing how users interact with your forms is invaluable.
Google Tag Manager (GTM) is a powerful tool that simplifies tracking form submissions without needing to write code. In this guide, we’ll walk you through how to track form submission messages in Tag Manager, focusing on a WordPress setup.
What is Google Tag Manager?
Google Tag Manager is a free tool that allows you to manage and deploy marketing tags (code snippets) on your website without modifying the code directly. GTM serves as a centralized platform where you can create and manage tags, triggers, and variables, making it easier to track user interactions like form submissions.
Key Features and Benefits
- Accurate Tracking: Google Tag Manager ensures precise form submission tracking, enabling you to capture crucial data for better decision-making.
- Enhanced SEO Insights: By monitoring user interactions, you gain valuable insights that help refine your SEO strategy, leading to higher search rankings.
- User Experience Optimization: Understanding form submission behavior allows for targeted improvements, boosting user satisfaction and conversion rates.
- Simplified Management: GTM’s centralized platform makes it easy to manage tags across your site, reducing the need for constant developer support.
- Scalability: Whether you’re managing a single site or multiple platforms, GTM scales effortlessly, providing flexibility as your business grows.
Why Track Form Submissions?
Tracking form submissions might seem like an extra step, but it’s one of those things that can really elevate your understanding of your audience and improve your website’s performance. Let’s break it down.
From a technical standpoint, tracking helps you pinpoint which forms are doing their job and which ones aren’t. Are users dropping off before they hit submit? Is a certain field causing confusion? By having this data, you can tweak the form, making it more user-friendly and efficient. This means higher conversion rates—whether that’s more leads, more sign-ups, or whatever goal your form is tied to.
But there’s more. Tracking lets you measure your marketing efforts. If you’re running campaigns, it’s crucial to know which sources are driving the most submissions. Are people filling out your form after clicking on a Facebook ad, or are they coming from organic search? This insight can help you allocate resources where they’ll have the most impact. You can monitor your site performance and top queries via Google Search Console.
What are Tags, Triggers, and Containers in Google Tag Manager?
When working with Google Tag Manager (GTM), you’ll often encounter terms like tags, triggers, and containers. These are the building blocks of GTM, and understanding them is essential for effectively tracking events on your website. Let’s break them down and cover some best practices for setting them up.
What Are Tags?
Tags are snippets of code or tracking pixels that you want to deploy on your website. In GTM, a tag can be anything from a Google Analytics code, a Facebook Pixel, or a custom HTML script. Tags are what send data from your website to third-party services.
- Types of Tags: GTM supports a variety of tags, including Google Analytics 4 (GA4), Google Ads, remarketing tags, and custom HTML tags.
- Good Practices:
- Always name your tags descriptively. For example, instead of “GA4 Tag,” use “GA4 – Pageview – All Pages” to specify what the tag does and where it applies.
- Test your tags before publishing them using GTM’s Preview mode to ensure they work as expected.
What Are Triggers?
Triggers tell GTM when to fire a tag. They define the conditions under which a tag should be executed. For example, you can set up a trigger to fire a tag when a form is submitted, a button is clicked, or a specific page is viewed.
- Types of Triggers: Some common triggers include page views, clicks, form submissions, and custom events.
- Good Practices:
- Like tags, give your triggers meaningful names. “Form Submit – Contact Us” is more informative than just “Form Trigger.”
- Use specific conditions within triggers to avoid unnecessary tag firing, which can slow down your site.
What Are Containers?
A container in GTM is like a folder that holds all your tags, triggers, and variables. When you create a GTM account for your website, you’re essentially creating a container. This container is what you embed into your website using the GTM code snippet.
- Good Practices:
- If you manage multiple websites, use separate containers for each site. This prevents conflicts and keeps your tags organized.
- Keep your container clean by regularly reviewing and removing unused tags and triggers.
Additional Best Practices
- Version Control: GTM offers version control, so every time you publish changes, it saves a new version. Always provide a version name and description for easy reference.
- Use Variables: Variables in GTM store values you can reuse across tags and triggers. This reduces redundancy and simplifies tag management.
- Debugging: Use the GTM debug panel to test your setup in real-time without affecting your live site. This helps catch errors before they go public.
Need Help Setting Up Tags for Your Website?
Our technical SEO experts are always around to give you a hand.
Steps to Set Up Google Tag Manager for WordPress
Before you can start tracking form submissions, you’ll need to set up Google Tag Manager on your WordPress site. This involves creating a GTM account, adding the GTM code to your site, and verifying the installation.
Step 1: Create a Google Tag Manager (GTM) Account
- Sign Up for Google Tag Manager:
- If you haven’t already, head over to Google Tag Manager and sign up.
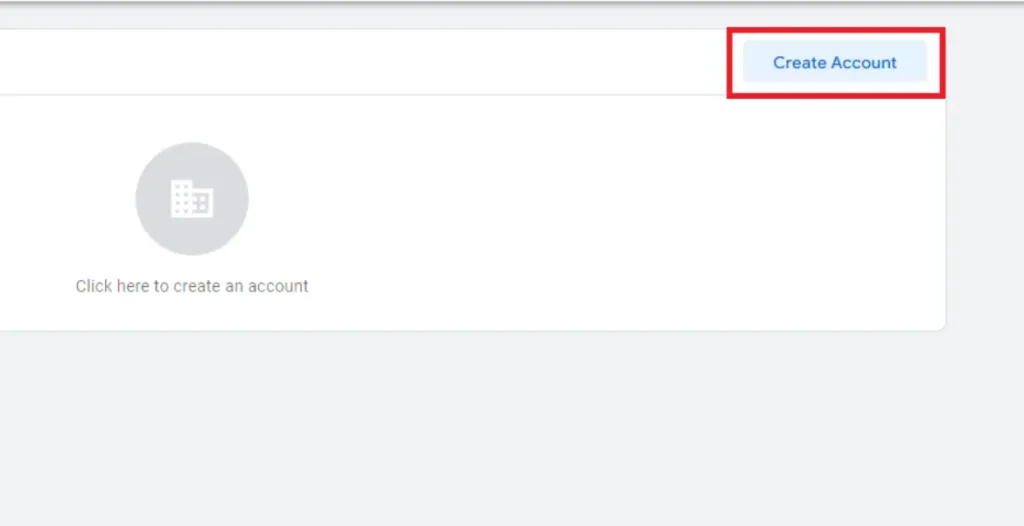
- Once signed in, click on “Create Account.”

2. Create a New Account and Container:
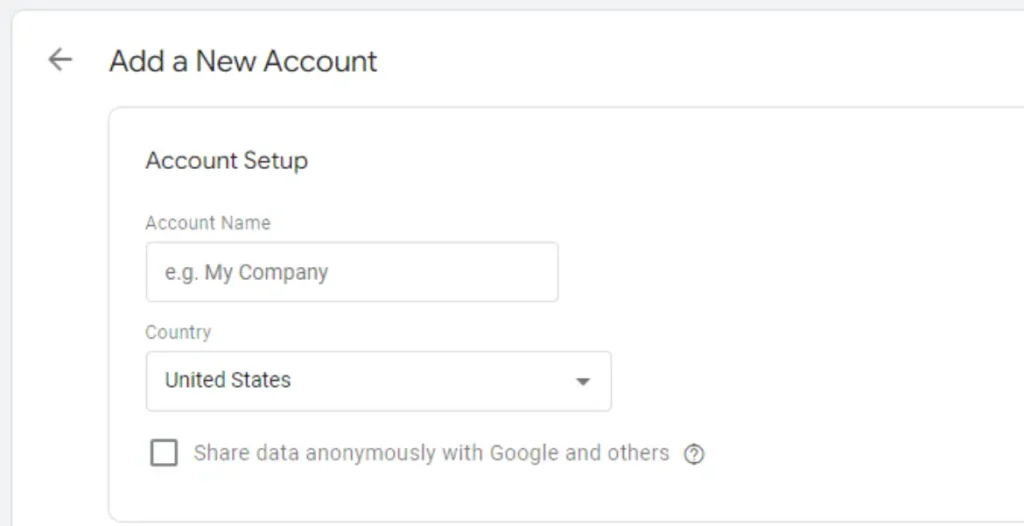
- Enter your account name, country, and other necessary details.
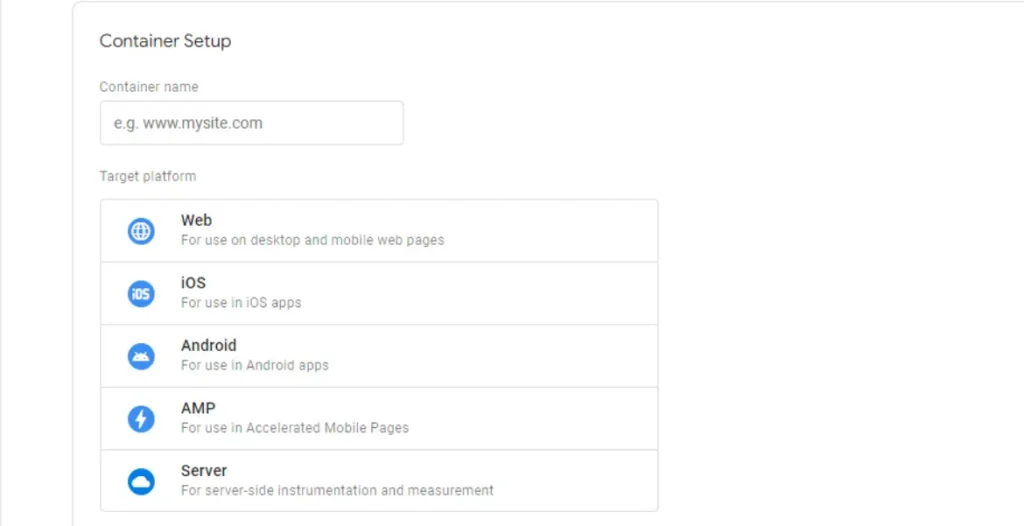
- Create a new container for your WordPress site by providing your website URL and selecting “Web” as the target platform.
3. Add Container Details:
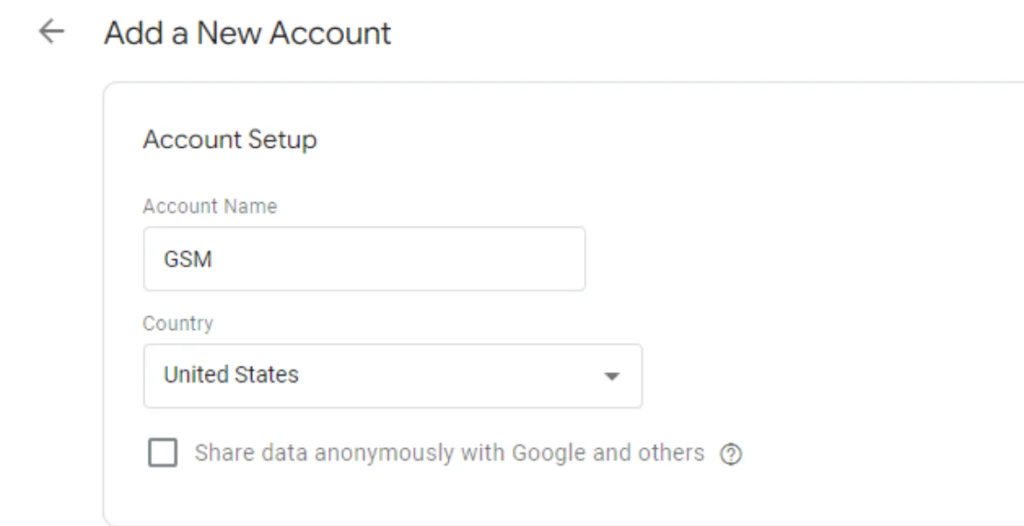
- Double-check that all your account details are accurate and complete.
- After verifying the details, click “Create” to generate your container.
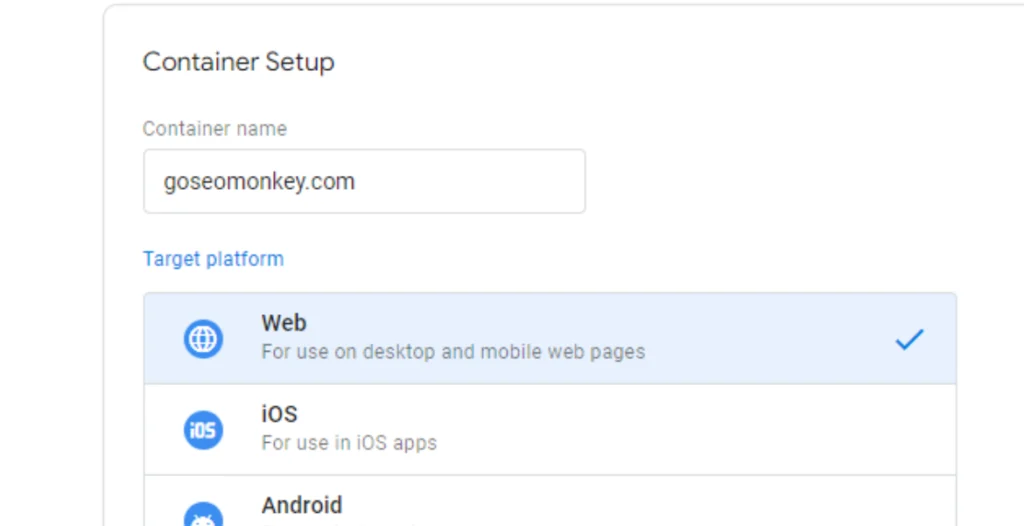
4. Get Your GTM Code Snippet:
- After creating the container, Google will provide you with a GTM code snippet. Keep this code handy as you’ll need it in the next step.
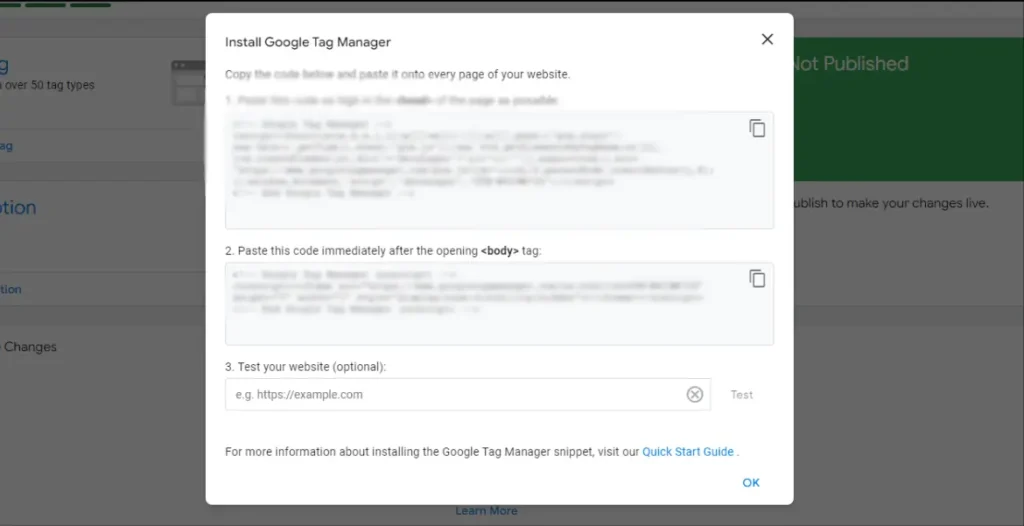
Step 2: Add the GTM Code to Your WordPress Site
- Log in to Your WordPress Admin Dashboard:
- Go to yourdomain.com/wp-admin and log in.
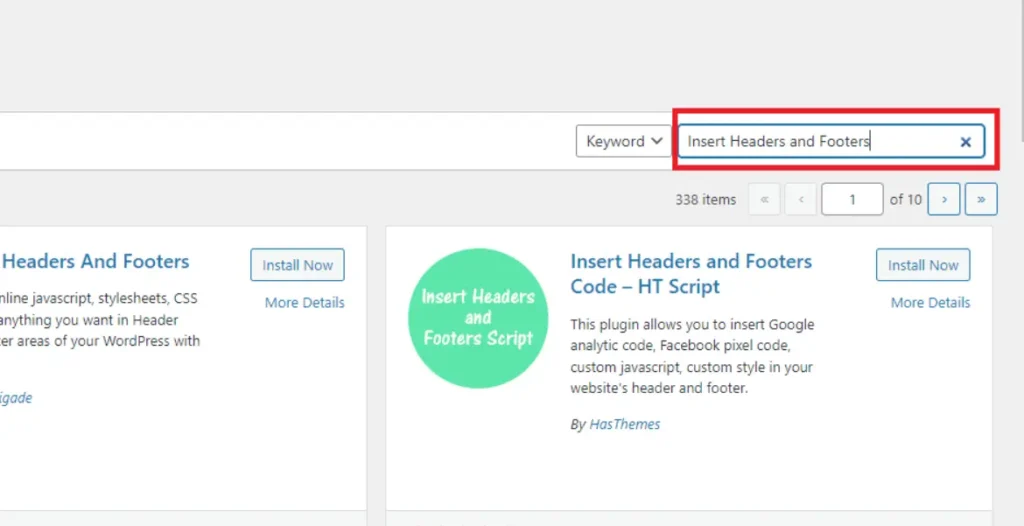
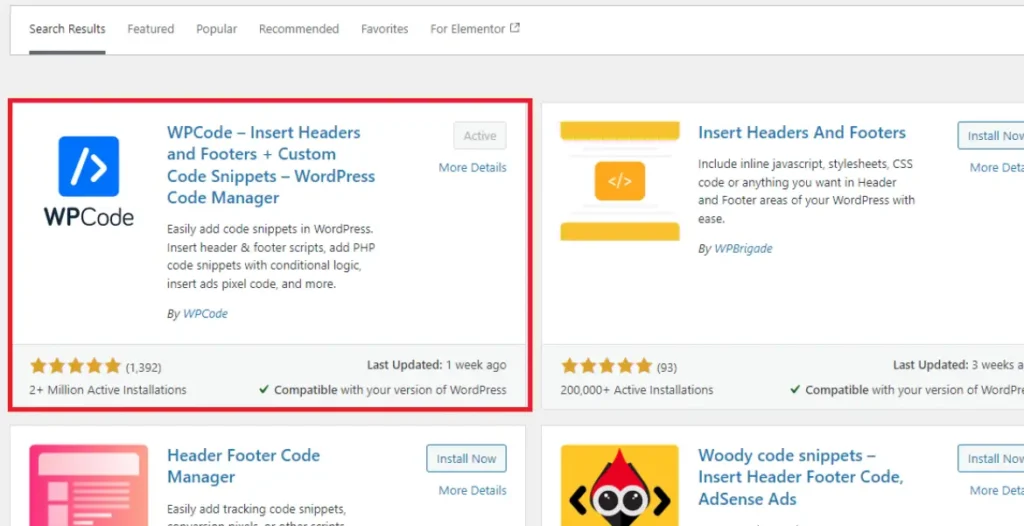
- Install the “Insert Headers and Footers” Plugin:
- From the left-hand menu, navigate to the “Plugins” section.
- Click “Add New” and search for “Insert Headers and Footers.”
- Install and activate the plugin.
3. Add the GTM Code Snippet to Your Site:
- Once the plugin is activated, find it in the left-hand menu under “Settings.”
- Click on “Insert Headers and Footers.”
- In the “Header” section, paste the first part of the GTM code snippet.
- In the “Body” section, paste the second part of the GTM code snippet.
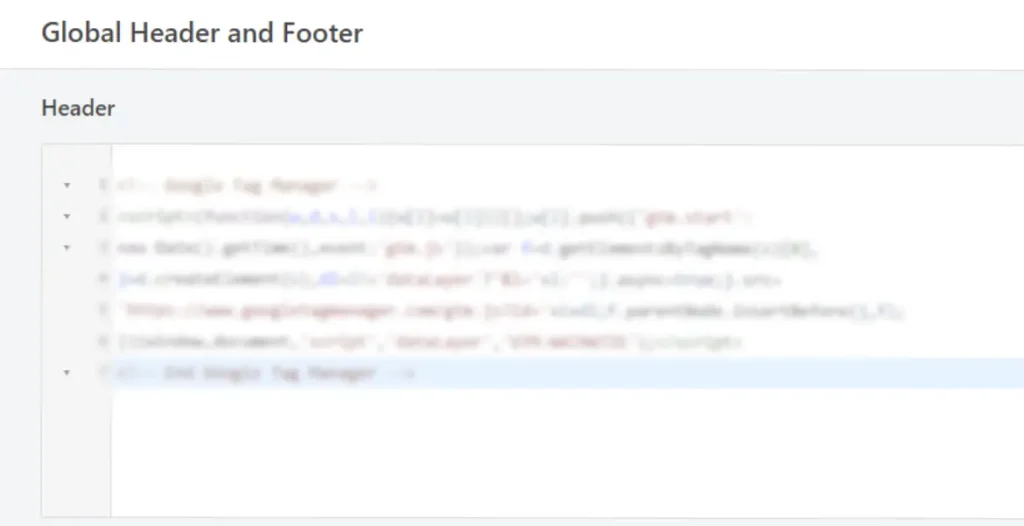
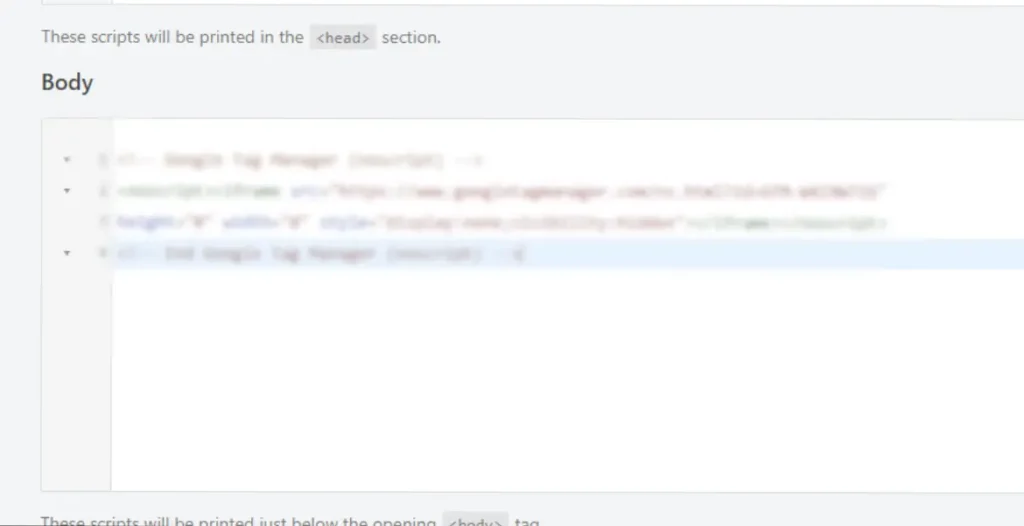
4. Save Your Changes:
- After pasting the code in both sections, click “Save” to apply your changes.
Step 3: Create a Form Submission Tag and Trigger in GTM
- Open Google Tag Manager:
- Return to your GTM account and open the container associated with your WordPress site.
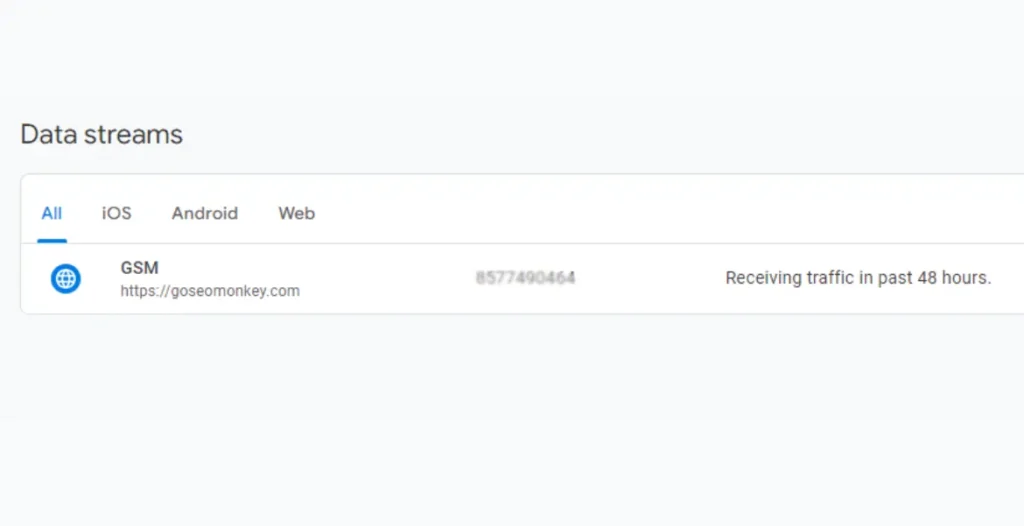
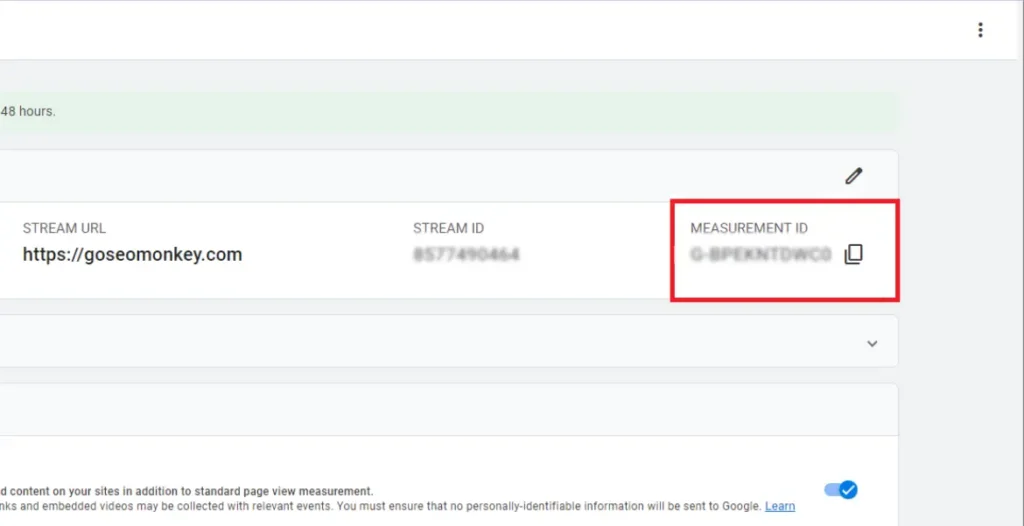
- Configure GA4 (If Needed):
- If this is your first time setting up GTM, you’ll need to configure Google Analytics 4 (GA4) first.
- Create a new tag labeled “GA4 Tag.”
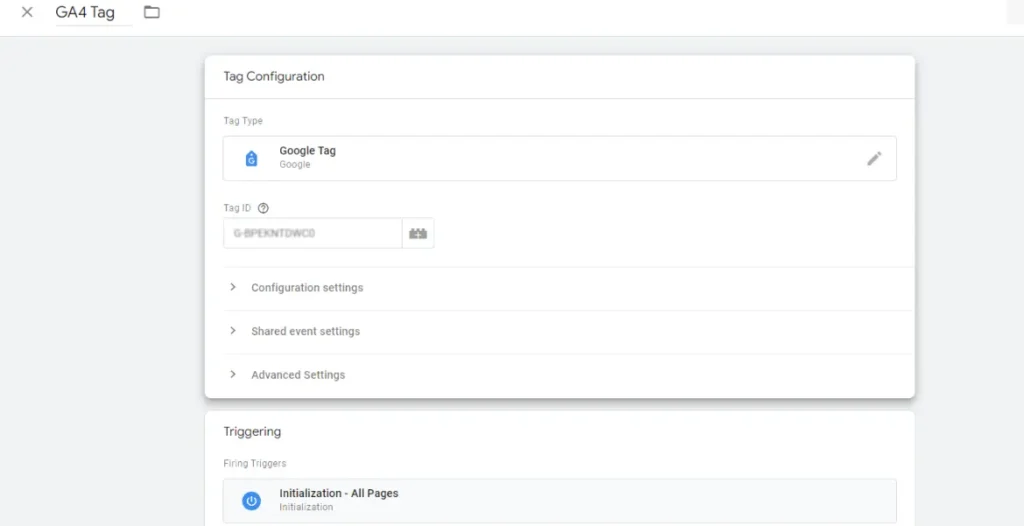
- Find your “Measurement ID” in the GA4 dashboard and enter it into the tag configuration.
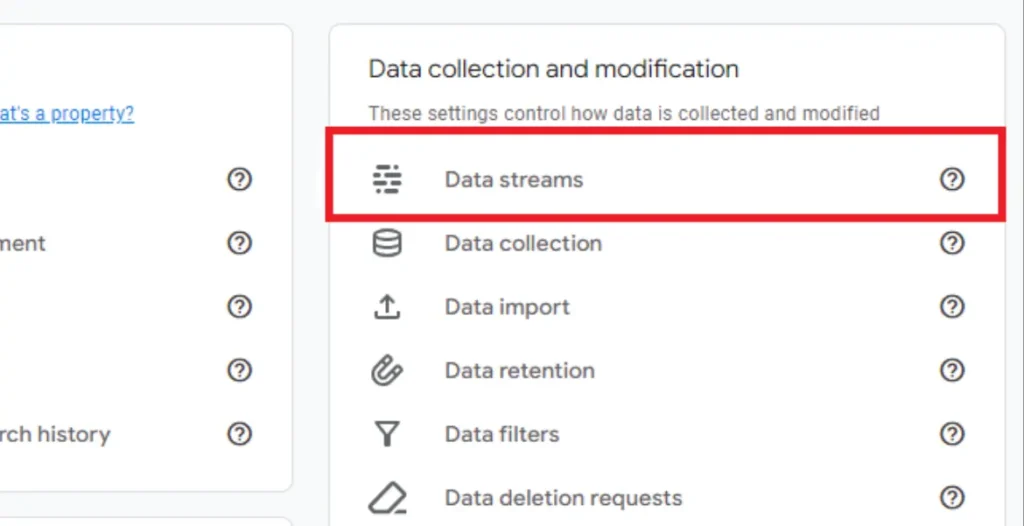
3. Create a New Tag for Form Submissions:
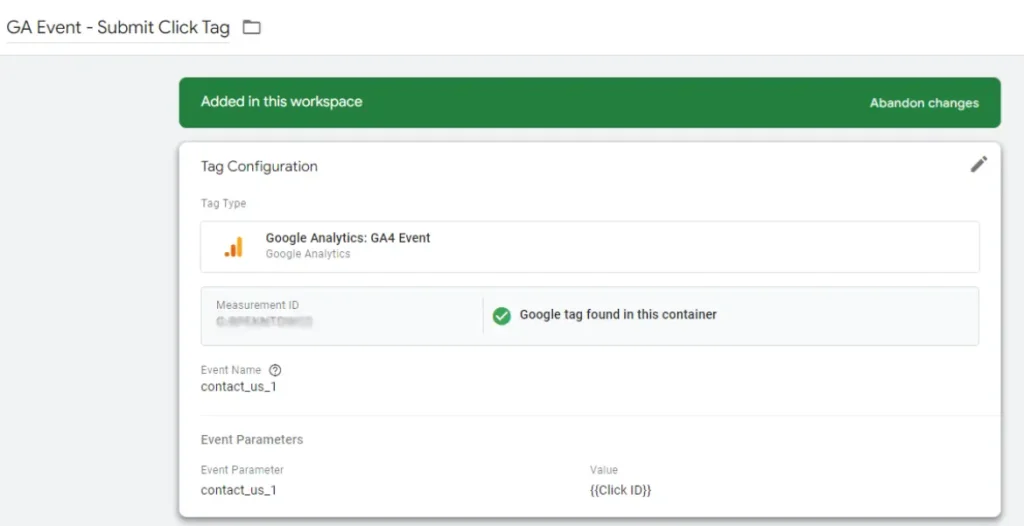
- In GTM, click on “Tags” and then “New.”
- Create a new tag called “GA Event – Submit Click Tag.”
- Enter the “Measurement ID” and other relevant details.
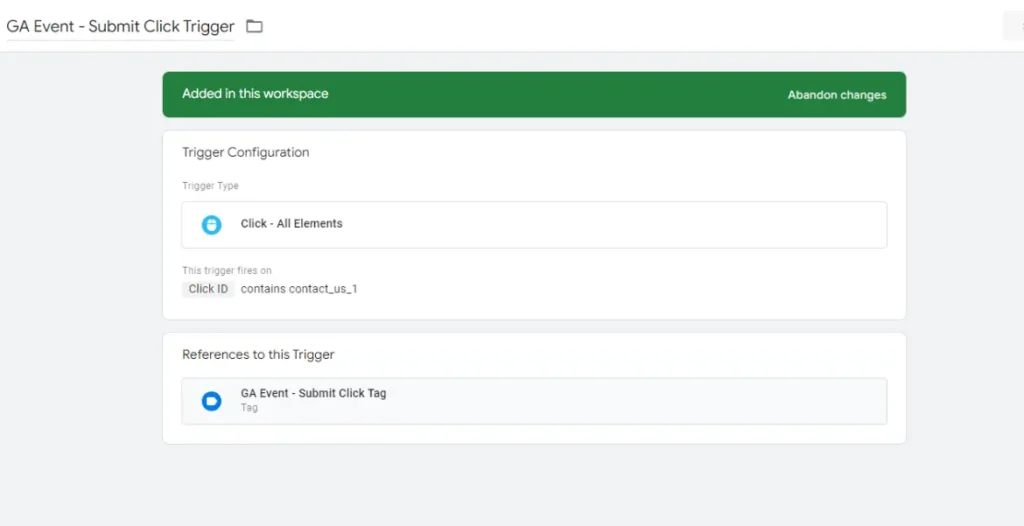
4. Add a Trigger:
- Add a trigger to this tag to specify when it should fire. For form submissions, you’ll want to use a “Form Submission” trigger.
Step 4: Test Your Setup
- Enable Preview Mode:
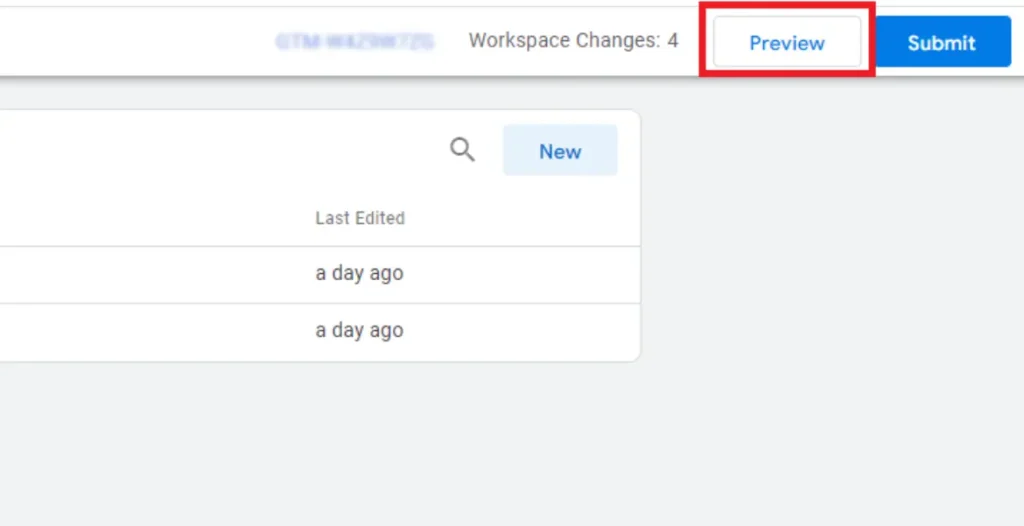
- Before going live, you need to test everything in GTM’s “Preview” mode.
- Click on “Preview” in the top-right corner of GTM.
2. Test the Trigger and Tag:
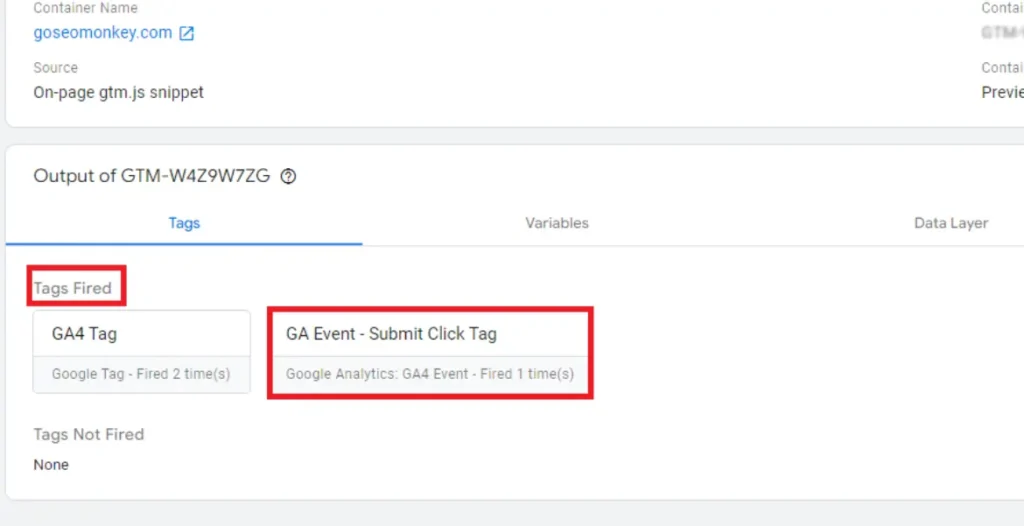
- In the preview mode, interact with your site as a user would—fill out the form and submit it.
- Make sure the tag fires correctly when the form is submitted.
3. Troubleshoot if Necessary:
- If the tag doesn’t fire, return to the GTM dashboard, check your trigger settings, and ensure everything is configured correctly.
Step 5: Publish Your GTM Container
- Publish the Container:
- Once you’ve confirmed that everything works, click “Submit” in GTM to publish your container.
- Optional Refinements:
- If your form has multiple submit buttons or other complex elements, you can refine the trigger conditions using the form’s specific IDs or classes.
- Debugging:
- Use GTM’s debug panel in Preview mode to troubleshoot any issues and ensure the trigger fires as expected.
Step 6: Check in Google Analytics (if applicable)
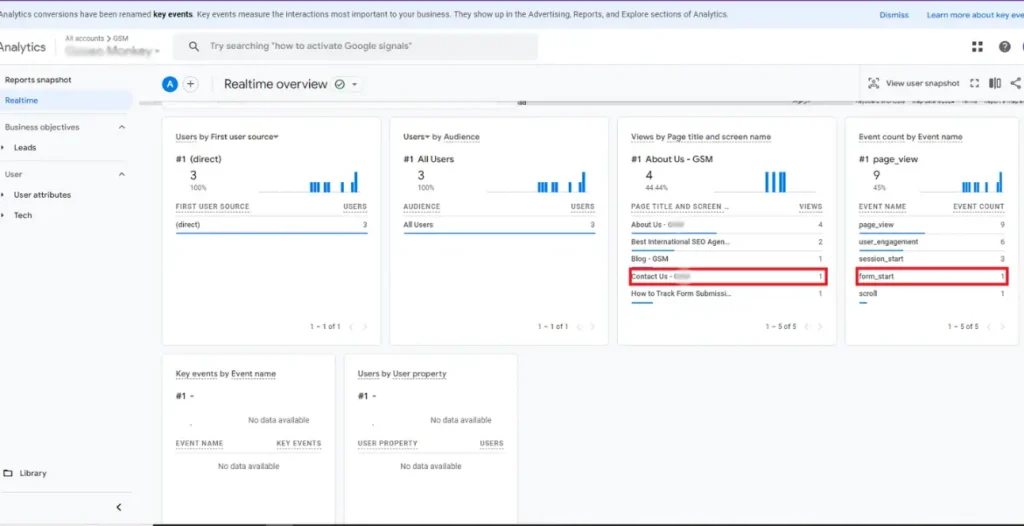
- If your form submission tag sends data to Google Analytics, go to your Google Analytics account.
- Navigate to Real-Time > Events to see if the form submission event is being tracked in real-time.
- Verify that the event category, action, and label match what you set up in GTM.
Having Trouble Setting Up GA4 for Your Website?
We can help! Give us a call and we’ll help you sort out efficient analytics for your website.
Conclusion
Proper GTM setup ensures that you can measure user interactions accurately, leading to better insights and more informed decisions. For businesses aiming to enhance their SEO strategy, precise tracking is invaluable. By understanding how visitors interact with your forms, you can optimize the user experience, boost conversions, and ultimately, improve your site’s search engine rankings.
However, managing GTM and ensuring it works seamlessly with other tools like Google Analytics can be complex. That’s where professional expertise comes in. If all this seems a bit overwhelming, don’t worry! Go SEO Monkey’s organic SEO services cover everything from setting up Google Analytics to optimizing your website for effective tracking and accurate data insights. We take care of the technical stuff so you can focus on your business growth.
FAQs
- How do I know if my form submission tracking is working?
Use GTM’s Preview Mode to test the trigger and check if the tag fires correctly when you submit a form. - What should I do if my form submission tag isn’t firing?
Double-check your trigger settings and ensure that the form ID or class matches the conditions set in GTM. - Can I track different forms separately in GTM?
Yes, you can create separate tags and triggers for different forms by using unique form IDs or classes. - Is it necessary to use Google Analytics with GTM?
While not required, using Google Analytics with GTM provides more detailed insights into user behavior. - How often should I check and update my GTM setup?
Regularly review your GTM setup, especially after making changes to your forms or website, to ensure everything is functioning correctly.


