Table of Contents
ToggleUnpublishing a page in WordPress allows you to hide it from public view without permanently deleting it. This is useful if you need to make updates or no longer want the page to be accessible but might use it again later. By changing the status of the page to draft or private, it becomes invisible to site visitors while remaining stored in the WordPress dashboard for future editing or publishing.
What Does It Mean to Unpublish a Page in WordPress?
When you unpublish a page in WordPress, you’re essentially hiding it from public view. However, the content remains intact in the backend of your website. Unlike deletion, which erases the content entirely, unpublishing allows you to bring the page back whenever you’re ready.
There are different levels of visibility in WordPress:
- Public: Anyone can view your page.
- Private: Only users who are already logged-in with the right authorization can see it.
- Password Protected: Users need a password and correct credentials to access the page.
Learn What Unpublishing a Page in WordPress Really Means
Our experts clarify the unpublishing process in WordPress to enhance your site management and user experience!
When Should You Unpublish a Page in WordPress?
There are several situations where you might want to unpublish a page rather than delete it:
- Content Updates: Maybe you’re refreshing the page and want to hide it until the changes are complete.
- Temporary Removals: The page is no longer relevant but might be again in the future.
- Redesigns or Overhauls: If your site is going through a significant design update, you might want to unpublish certain pages until everything looks right.
Step-by-Step Guide: How to Unpublish a Page in WordPress
Method 1: Changing Page Status to Draft
The easiest and most common way to unpublish a WordPress page is to change its status to a draft.
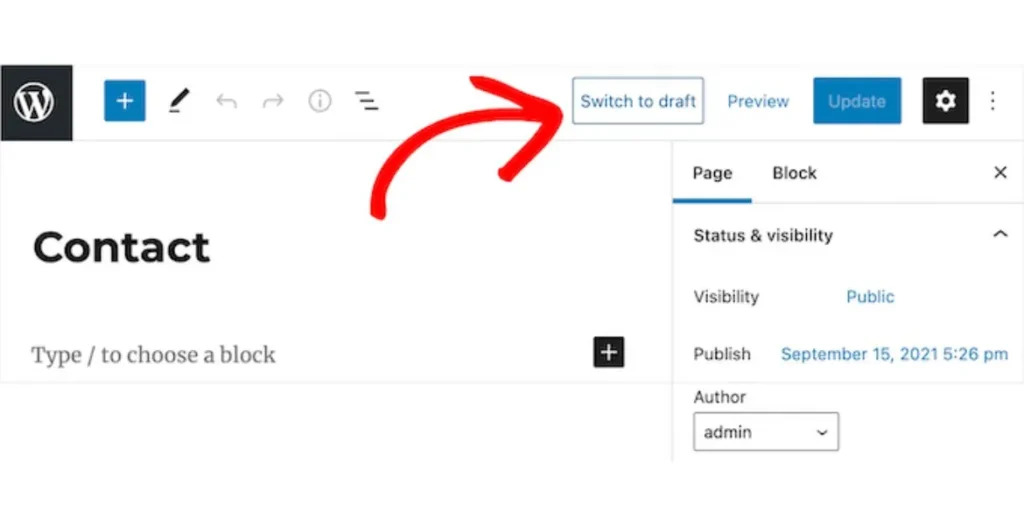
- Navigate to Pages: Log in to your WordPress dashboard and click on “Pages.”
- Select the Page: Choose the page you want to unpublish.
- Change Status: On the right-hand side, look for the “Status & Visibility” section and change the status from “Published” to “Draft.”
- Save: Hit the “Update” button, and the page will no longer be live on your site.
This method is perfect if you plan to republish the page after making some updates.
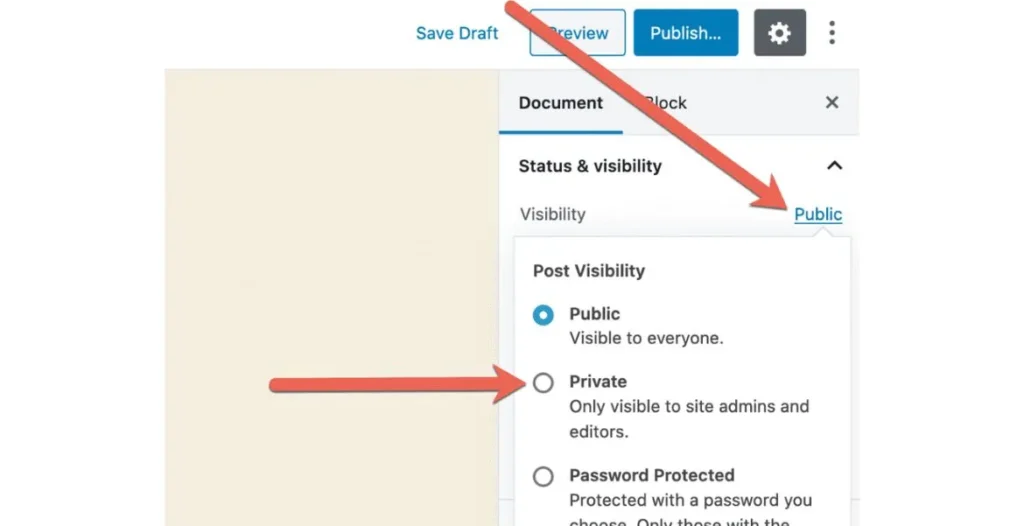
Method 2: Making a Page Private
If you want to keep the page online but restrict its visibility, you can set it to private. This option will make the page only accessible to logged-in users with the appropriate permissions.
- Go to Pages: From your dashboard, head to the “Pages” section.
- Choose the Page: Click on the page you want to unpublish.
- Change Visibility: In the “Status & Visibility” section, select “Private.”
- Update: Save your changes, and your page will be removed permanently from public view.
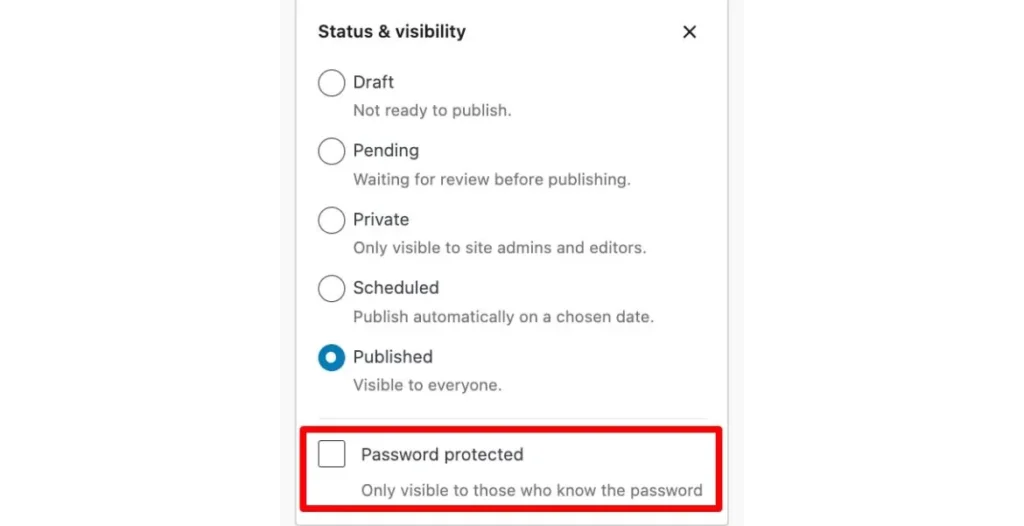
Method 3: Using a Password Protection Feature
WordPress offers a password protection feature so you can secure your page with a password. Only users with the accurate password can view and access the page.
- Edit Page: Navigate to the page you want to protect.
- Set Password: Under “Visibility,” select “Password Protected” and enter your chosen password.
- Update: Save the changes, and now only users with the password will be able to view the page.
How to Temporarily Unpublish a WordPress Page Using Plugins?
Temporarily unpublishing a WordPress page using plugins is a great option if you want more control over page visibility or need to hide pages while making updates. Two popular plugins for this purpose are WP Maintenance Mode and Under Construction Page. Below is an explanation of these plugins, along with step-by-step instructions on how to use them.
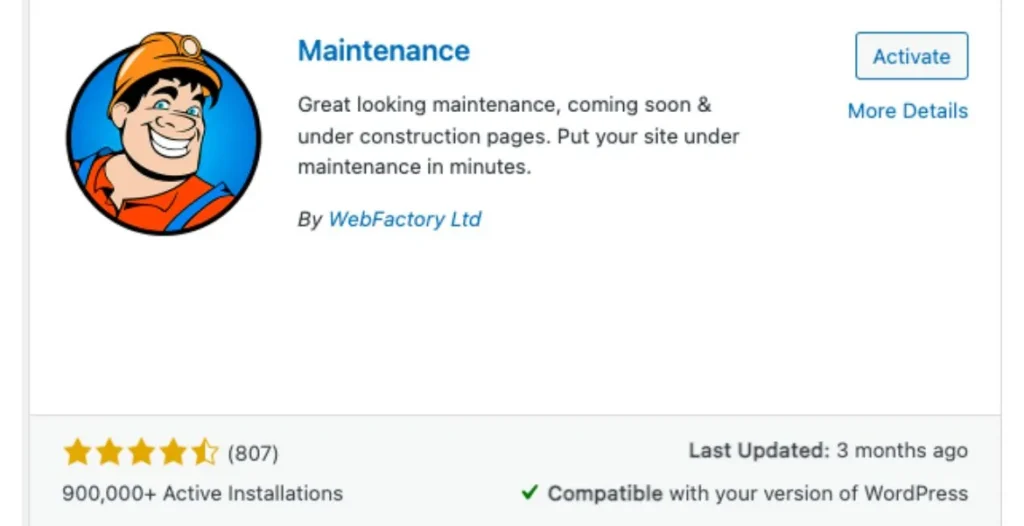
1. WP Maintenance Mode
WP Maintenance Mode allows you to put your entire site or specific pages in maintenance mode, displaying a “coming soon” or maintenance message while you work behind the scenes.
Key Features:
- Puts your site or individual pages in maintenance mode.
- Allows you to display a custom maintenance message.
- Select which users can still access the site (e.g., administrators).
- Can be turned enabled or disabled with just one click.
How to Use WP Maintenance Mode:
- Install the Plugin: Go to the WordPress dashboard, navigate to the following:
- Plugins > Add New.
- Search for “WP Maintenance Mode”.
- Install it.
- Activate it.
- Enable Maintenance Mode: After activation, go to Settings > WP Maintenance Mode. In the General tab, toggle the Activate option to On.
- Customize the Display: In the Design tab, customize the message you wanted to show your visitors when they try to access the page or site.
- Select Pages or Entire Site: If you only want to hide specific pages, use the Exclusions option to choose which pages to display while others remain hidden.
- Save Settings: Once you’re done, save the settings, and your site or selected pages will be temporarily unpublished.
2. Under Construction Page
The Under Construction Page plugin is ideal for temporarily hiding specific pages while you work on them. It provides easy setup and customization options for displaying an “under construction” message.
Key Features:
- Quickly hides specific pages or the entire site.
- Displays an “under construction” message.
- Allows custom messaging and design.
- Option to set a timer or specific date for the page to go live again.
How to Use Under Construction Page:
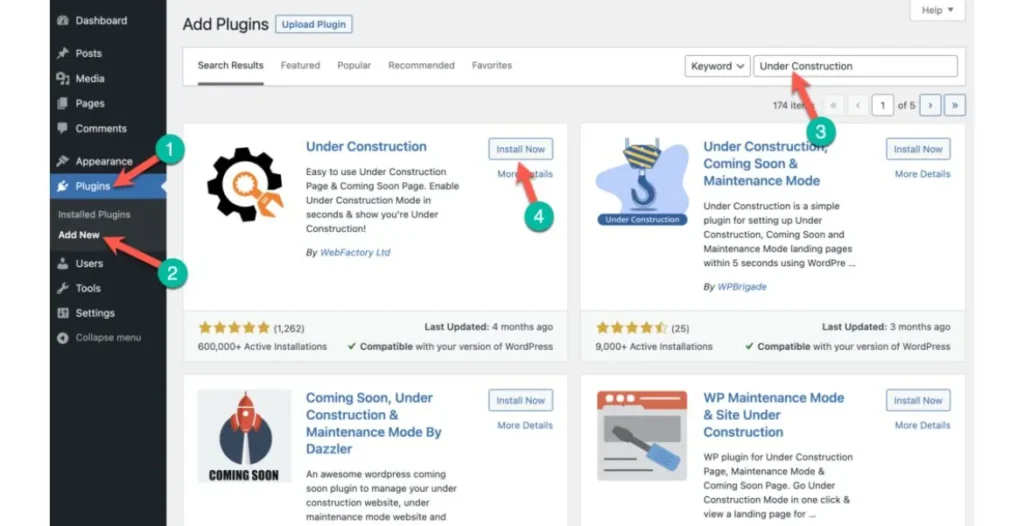
- Install the Plugin: In your WordPress dashboard follow the following commands:
- Plugins > Add New.
- Search for “Under Construction Page”.
- Install that page.
- Activate it.
- Enable Under Construction Mode:
- Navigate to Settings > Under Construction.
- Change the Under Construction Mode to On.
- Customize the Message: Go to the Content section to write a custom message, such as “This page is under construction. Check back soon.”
- Choose Visibility: In the Access section, you can select which users (e.g., admins or logged-in users) can view the live page while it’s hidden from the public.
- Set a Timer (Optional): In the Content settings, you can set a date for when the under-construction mode will automatically turn off.
- Save Settings: Once you’ve configured the settings, click Save Changes, and your selected page(s) will now be hidden.
How to Unpublish a WordPress Site (Completely)?
If you want to hide your entire website rather than just individual pages, you can either:
- Temporarily disable your site by changing your settings to “Coming Soon” or “Maintenance Mode.”
- Use a Plugin: Use a plugin like WP Maintenance Mode to block access to your whole site temporarily.
Common Mistakes to Avoid When Unpublishing Pages
Some common errors to avoid when unpublishing pages include:
- Broken Internal Links: If you unpublish a page, make sure any internal links pointing to that page are updated or removed.
- Search Engine Visibility: Double-check that unpublished pages don’t show up in search results.
Unpublish vs. Delete: Which One Should You Choose?
Check frequently when it is required to unpublish a page or to omit a page in WordPress. If the content may become relevant again or you plan to update it in the future, unpublishing is the better option because it keeps the content accessible in your dashboard.
You can easily republish it when needed without having to recreate the page from scratch. Deleting, on the other hand, is a permanent action—once deleted, the page and its content are gone unless you have a backup in place.
Deleting a page can also impact your website’s structure, especially if that page was linked to other parts of your site. Broken internal links can harm user experience and SEO, so if you delete a page, make sure to update or remove any links pointing to it. Consider deletion only when the page is obsolete and won’t be needed again in the future.
Discover the best choice: Unpublish or Delete?
Our specialists guide you in choosing unpublish or delete wisely!
Does Unpublishing Affect SEO?
Unpublishing a page can impact your site’s SEO, especially if the page was already indexed by search engines. Search engines might still retain a cached version of the page, and visitors could face broken links if the page is suddenly made unavailable.
This may result in 404 errors, affecting your site’s ranking. To keep down these issues, look at using SEO services that focus on effectively managing and redirecting traffic.
Use a "noindex" Tag Before Unpublishing
To avoid SEO complications, adding a “noindex” tag ensures seamless SEO transition. The noindex tag tells search engines to exclude the page from their index, avoiding extra and non essential crawling.
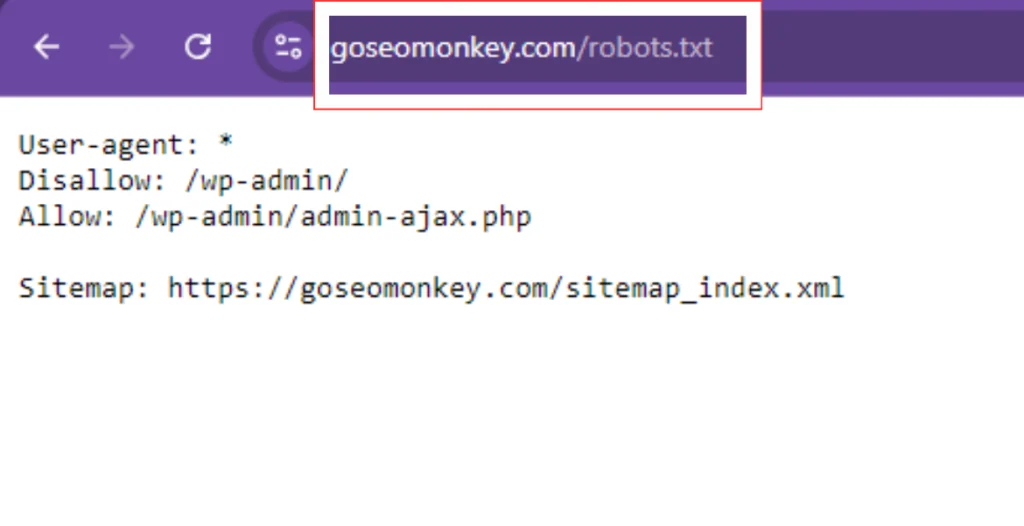
Block Search Engines with the robots.txt File
Consider modifying your robots.txt file to restrict search engine crawlers from accessing the unpublished content. By doing this, you ensure that the page won’t harm your SEO efforts while it remains unpublished.
Manually Resubmit for Indexing Upon Republishing
Once you decide to republish that modified page, you need to manually resubmit it again for indexing to search engines. It will help to boost your site ranking in SERPs. This will help ensure the page is crawled again and included in search engine results pages (SERPs).
How to Keep Unpublished Pages Out of Search Engine Results?
When you unpublish a page in WordPress, it’s crucial to ensure that it doesn’t appear in search results, especially if it was previously indexed by search engines. Although unpublishing hides the page from your site visitors, search engines may still have the page cached and indexed.
This can lead to broken links, negative user experiences, and even hurt your SEO if users land on a 404 error page. To fully remove an unpublished page from search results, use the following methods:
- Noindex Tag: Before unpublishing the page of your WordPress site, add a “noindex” tag to its header. This noindex tag will guide search engines not to include the page in their search results. You can do this manually by editing the page’s HTML or using an SEO plugin like Yoast or Rank Math to apply the noindex tag. Make sure to update the page’s SEO settings before unpublishing to ensure it’s not crawled after being unpublished.
- robots.txt File: There are many ways to prevent search engines from crawling your unpublished page and one of them is by editing your robots.txt file. Specify the page’s URL in a Disallow rule within your robots.txt file to restrict access of unauthorized users to the page’s URL. This method is useful if you’re managing multiple unpublished pages and want to ensure they’re not crawled in bulk. Be cautious when editing this file, as incorrectly disallowing other pages could harm your overall SEO.
In addition to these methods, you should also remove any internal or external links pointing to the unpublished page to avoid any accidental access. Finally, consider using Google’s URL Removal Tool to expedite the process of removing the page from Google’s index if it was already indexed.
Re-Publishing Pages After Unpublishing: What to Expect
When you decide to republish a previously unpublished page, keep these key factors in mind:
- Update the Content: Ensure the content is current and according to your client’s demands. Outdated information can affect your site’s ranking.
- Check for Broken Links: Verify that all links, references, and information are still accurate and applicable, especially if products or services have changed.
- Address SEO Concerns: If the page was marked with a “noindex” tag or blocked by robots.txt, resubmit it for indexing to ensure it gets crawled by search engines.
- Monitor Page Performance: After republishing, keep an eye on how the page performs in search engine rankings, as they may have shifted while the page was unpublished.
- Use Google Search Console or SEO Tools: Track the page’s performance in SERPs using tools like Google Search Console or an SEO plugin to make sure it regains visibility smoothly.
Managing Page Visibility with User Roles
WordPress provides powerful options for controlling who can access your unpublished or private pages by assigning specific user roles. Key points include:
- Control User Access: Assign roles such as editors or administrators to view and edit unpublished content, while keeping it hidden from lower-level users like subscribers or contributors.
- Private Pages: Create private pages that are only visible to users with specific permissions, ideal for internal collaboration or sharing drafts.
- Custom Roles with Plugins: Use plugins like Members or User Role Editor to customize roles and permissions, ensuring only the right people can access certain content.
- Team Collaboration: This feature is particularly useful for teams working together on a site, allowing controlled access to unpublished content during the editing process.
How to Track Unpublished Pages in WordPress?
Staying organized is essential when managing unpublished pages in WordPress. Over time, it’s easy to forget about hidden or unpublished content, especially if you’re managing a large website.
Fortunately, WordPress provides a few simple ways to keep track of these pages. In the Pages section of your WordPress dashboard, you can filter pages by status, such as Draft, Private, or Pending Review. This way, you can quickly see which pages are unpublished.
Additionally, page management plugins like Content Views or WP Page Manager can help you track and manage your unpublished content more effectively. These tools allow you to sort and filter pages, set reminders for updates, and prevent important pages from getting lost in the shuffle.
Tracking unpublished pages ensures that you can easily find and republish content when needed or delete it if it’s no longer relevant.
The Importance of Keeping Your WordPress Pages Organized
Here are some key points to keep in mind when unpublishing pages and maintaining an organized website:
- Regularly Review Unpublished Content: Set a schedule to update, republish, or delete drafts and private pages that are no longer needed to prevent clutter in your dashboard.
- Use Categories, Tags, or Labels: Organize unpublished content by topic or project to keep your site clean, optimized, and SEO-friendly.
- Avoid Missed Opportunities: Too many unpublished pages can lead to missed chances for republishing valuable content or tracking important updates.
- Manage Internal Links: Organized pages make it easier to handle internal links and prevent broken pages, which can affect user experience and search rankings.
Discover Effective Ways to Organize Your WordPress Pages!
Our team helps streamline your WordPress pages for peak performance!
Conclusion
Unpublishing a page in WordPress is a straightforward and essential feature for any website owner. Whether you’re making temporary updates or hiding outdated content, WordPress provides multiple ways to manage visibility. For more advanced WordPress management services, reach out to Go SEO Monkey. We specialize in helping businesses optimize their websites for search engines and enhance their online visibility.
FAQs
- How do I unpublish a page in WordPress without deleting it?
You can change the page’s status to draft or make it private. - Does unpublishing affect my SEO rankings?
It can if the page was indexed, but you can prevent that with a “noindex” tag or updating your robots.txt file. - Can I make a WordPress page temporarily unavailable?
To temporarily remove access, unpublish the page or activate a maintenance mode plugin. - What’s the difference between unpublishing and deleting a page?
Unpublishing hides the page but keeps it in your system, while deleting removes it permanently. - How can I ensure unpublished pages don’t show up in search results?
Use a “noindex” tag or permanently block them in your robots.txt file to avoid search engines from indexing the pages.